At some point, every sea glass collector faces the same problem. You've got bags of glass sitting in drawers, piling up on shelves, rattling around in ziplock bags. You love these pieces - you remember where you found each one - but shoving them in a closet isn't doing them justice. They deserve to be seen.
The good news is that sea glass is one of the easiest collectibles to display well. It's colorful, it catches light beautifully, and it works with almost any decor style from coastal cottage to modern minimalist. You don't need to be crafty or spend much money. Some of the best displays are dead simple.
Here are practical ideas organized from easiest to most involved, so you can find something that fits your skill level and the time you want to invest.
Simple Displays That Work Immediately
Glass Jars and Vases
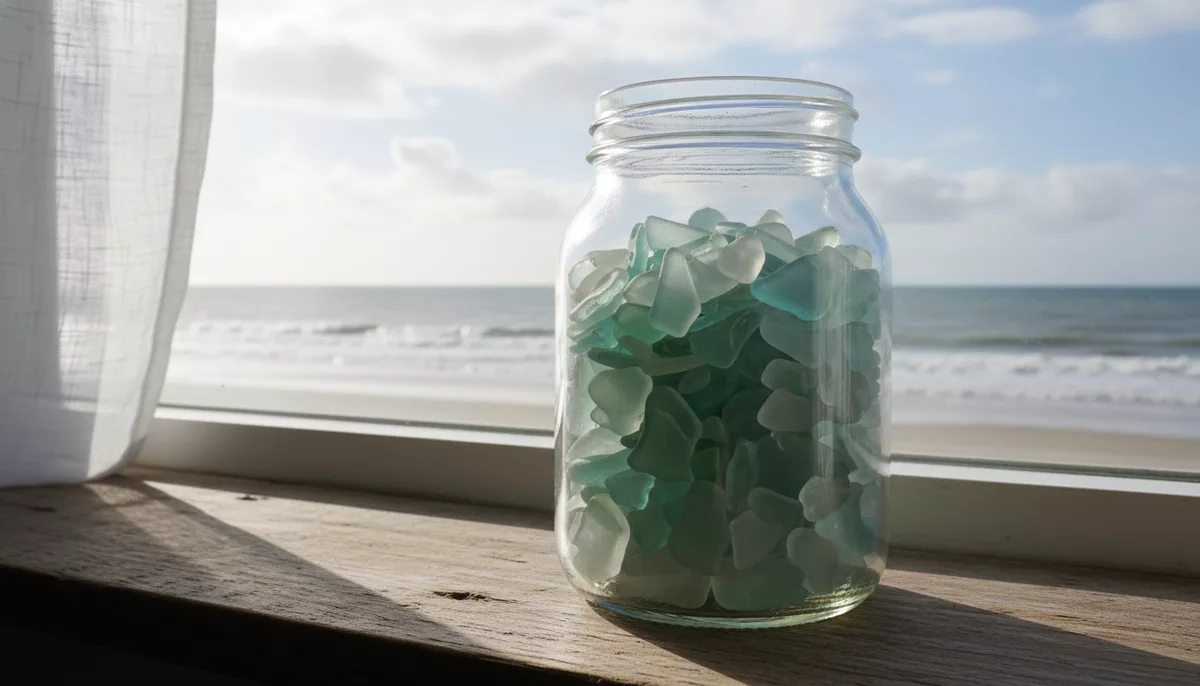
This is where most collectors start, and honestly, many never need to go further. Fill a clear glass jar - mason jars, apothecary jars, old pickle jars, whatever you have - with sea glass and set it somewhere light can reach it. A windowsill is ideal. When sunlight passes through, the colors glow and shift throughout the day as the light angle changes.
A few things that make jar displays look better:
- Sort by color. A jar of mixed sea glass looks nice, but a row of jars sorted by color - one white, one green, one blue, one brown - looks intentional and curated. It also helps you see just how much variety you've collected.
- Mix jar sizes. Three or five jars of different heights grouped together creates visual interest. Odd numbers look more natural than even.
- Add water for special occasions. Filling a jar with water transforms the colors - everything gets deeper and more vivid. It's a temporary display since you'll want to empty and dry it eventually, but it's striking for a dinner party or gathering.
- Use clear, uncolored glass. Tinted jars compete with the sea glass colors. Clear glass lets the collection speak for itself.
The best part of jar displays is they're always evolving. Every trip to the beach adds new pieces. Guests notice them, pick them up, ask where they came from. A jar of sea glass on a kitchen windowsill is a conversation starter that never gets old.
Bowls and Dishes
Shallow bowls and dishes give you a different look than jars. Instead of seeing glass through glass, you're looking down at the pieces spread out where you can appreciate individual shapes and colors. A wide, shallow wooden bowl on a coffee table filled with sea glass becomes a tactile centerpiece - people instinctively reach in and handle the pieces, which is part of the appeal.
White ceramic bowls work particularly well. The white background makes colors pop and gives the display a clean, gallery-like quality. Dark bowls create contrast too, especially with lighter glass. Avoid bowls with busy patterns or bright colors - they distract from the sea glass.
For your rarest pieces, consider a small individual dish or stand. A single piece of red or orange sea glass on a simple white dish gets more attention than it would buried in a jar with fifty green pieces.
Trays and Platters
A wooden or wicker tray lets you create a flat, organized display. Arrange pieces by color gradient - white to green to blue to brown - or by size, or by the beach where you found them. Label sections with small cards if you want to get museum-like about it. Trays work well on bookshelves, mantels, or entry tables where you want a horizontal display that doesn't take up vertical space.
Shadow Boxes and Frames
Basic Shadow Boxes
Shadow boxes turn sea glass into wall art. Buy a deep shadow box frame (at least 1.5 inches deep so pieces don't press against the glass front), arrange your sea glass inside, and hang it. You can glue pieces to a backing board for a permanent arrangement, or leave them loose so they shift slightly when the box is bumped - some people prefer the organic, beach-like feel of loose pieces.
Arrangement tips for shadow boxes:
- Color gradient. Arrange pieces in a smooth transition from light to dark, or from cool tones (blues, greens) to warm tones (ambers, browns). This creates a visual flow that draws the eye across the display.
- Single color, multiple shapes. Fill the entire box with one color family - just whites, or just blues. This showcases the surprising variety within a single color. You'll notice differences in thickness, frost level, and shade that get lost in mixed displays.
- Grid layout. Use evenly spaced rows and columns for a modern, graphic look. This works especially well with pieces that are similar in size.
- Beach memory box. Combine sea glass with other finds from a specific trip - shells, pottery shards, a small piece of driftwood, a handful of sand. Label it with the beach name and date. It becomes a memory capsule that means more than any of the individual pieces.
Framed Art Pieces
For a more polished look, mount sea glass on a mat board inside a standard picture frame. Hot glue or E6000 adhesive works - apply a small dot to the back of each piece and press it firmly against the board. You can create patterns, spell out words, or form shapes like hearts, fish, or waves. These make excellent gifts, especially when you use glass from a beach that holds significance for the recipient.
Suncatchers and Window Displays
Sea glass and sunlight are natural partners. The frosted surface diffuses light in a way that's uniquely beautiful - not the sharp transparency of regular glass, but a soft, glowing quality that changes as the sun moves.
Wire-Wrapped Suncatchers
If you've done any sea glass jewelry making, you already have the skills for this. Wrap individual pieces in wire - copper, silver, or brass - with a loop at the top for hanging. String several wrapped pieces on fishing line at varying heights and hang the whole assembly in a window. When the sun hits, each piece lights up independently and casts colored shadows on the wall behind.
Thinner, more translucent pieces work best for suncatchers. Those thick, heavily frosted chunks that aren't ideal for jewelry are also not great for light transmission. Save your best translucent pieces for window displays.
Driftwood Hangings
Find a piece of driftwood roughly 12 to 18 inches long. Drill small holes along its length (or use natural gaps in the wood), and hang sea glass pieces from it on fishing line or thin chain. Hang the driftwood horizontally in a window. The combination of bleached wood and frosted glass reads as unmistakably coastal without being kitschy.
You can also wrap wire directly around the driftwood and nestle sea glass pieces into the wire coils. This creates a more sculptural piece that works hanging on a wall rather than in a window.
Resin Window Panels
For a more permanent suncatcher, embed sea glass in clear epoxy resin poured into a silicone mold. The result is a flat, transparent panel with glass pieces suspended inside. When hung in a window, light passes through both the resin and the sea glass, creating a stained-glass-like effect. This technique requires some practice with resin mixing and pour timing, but the results can be genuinely stunning. Round molds in the 6 to 8 inch range work well - large enough to include several pieces but small enough to hang easily.
Mosaics and Permanent Installations
Tabletop Mosaics
An old side table or tray becomes art when you mosaic sea glass into its surface. Apply thinset mortar or a thick layer of adhesive, press sea glass pieces into it in your chosen pattern, and grout between the pieces once the adhesive sets. Seal with a clear polyurethane to make it waterproof and easy to clean.
Color-sorted mosaics look best. Create bands of color that flow across the surface, or use a central focal point of your rarest colors surrounded by more common pieces. A tabletop mosaic uses a lot of glass - it's a good destination for the large collection of common whites and greens that most collectors accumulate.
Stepping Stones
Concrete stepping stones with embedded sea glass bring your collection into the garden. Mix concrete in a round mold (a plastic plant saucer works), let it set for about 30 minutes until it's firm but not hard, then press sea glass pieces into the surface. Let it cure fully before setting the stone in place. The pieces will catch rain and sunlight in a way that makes garden paths feel special.
Use your less-prized pieces for this. Garden stepping stones take weather, foot traffic, and occasional lawnmower contact. Don't put your rare reds out there.
Bathroom and Kitchen Accents
A line of sea glass tiles set into a kitchen backsplash or bathroom border adds a custom touch that's subtle but distinctive. This works best during a renovation when you have access to the wall surface. Set pieces into thinset alongside regular tiles, grout normally. Sea glass handles the moisture of kitchens and bathrooms without any issues - it's already spent years in salt water.
Mirror frames are another option. Glue sea glass around the border of a plain mirror for a bathroom that looks like it belongs in a beach house. Again, common colors work fine here - you need volume more than rarity.
Display Tips for Serious Collectors
Sorting and Cataloging
If you've moved beyond casual collecting into actively seeking rare colors and specific origins, your display should reflect that. Consider organizing by:
- Rarity. Reference a color rarity chart and group your collection by tier. Common greens and whites in one area, uncommon colors in another, and your genuinely rare pieces - reds, oranges, yellows, blacks - given prominent individual placement.
- Origin. If you collect from multiple beaches, separate by location. A piece from Seaham Beach has a different story than one from Davenport, and displaying them together with labels adds meaning.
- Type. Bottle glass, tableware, art glass, industrial glass - each has distinct characteristics. Grouping by type tells a story about the glass's life before the ocean got hold of it.
Lighting Makes the Difference
Natural light is best, but if your display isn't near a window, a small LED strip or puck light can transform it. Position the light behind or below transparent displays so it shines through the glass rather than reflecting off the surface. Backlit sea glass in a shadow box or on a glass shelf is dramatically more beautiful than the same pieces in ambient room light.
Avoid warm-toned bulbs (2700K) if color accuracy matters to you. Daylight bulbs (5000K-6500K) show sea glass colors more accurately. That pale blue piece might look green under warm light, which is misleading if you're trying to showcase your color range.
Protecting Valuable Pieces
Most sea glass is durable enough to handle freely - it survived decades in the ocean. But if you have pieces with particular value, whether monetary or sentimental, a few precautions help:
- Keep out of direct sun for extended periods. UV exposure over years can subtly alter the frosting on some glass colors. If your display gets intense afternoon sun, rotate pieces periodically.
- Avoid stacking heavy pieces on delicate ones. Some well-tumbled pieces have thin edges that can chip under pressure.
- Document before displaying. Photograph your best pieces individually before they go into a display. If a piece gets lost, broken, or mixed into a larger collection, you'll have a record.
- Use museum wax for individual displays. A tiny dab of museum wax holds a piece on a shelf or stand without any adhesive residue, and it's fully removable.
Wet vs. Dry Display
This comes down to personal preference, but it's worth understanding the tradeoff. Dry sea glass shows the frosted patina that ocean tumbling creates - the whole reason collectors prize genuine sea glass over tumbled craft glass. Wet sea glass reveals the original color more vividly and can be quite stunning, but it hides the frosting.
Some collectors keep a shallow dish of water on their desk with a few rotating pieces. Others use a light coating of mineral oil or coconut oil to give pieces a wet look without actually keeping them in water. The oil darkens over time and needs reapplication, so it's maintenance-heavy. For most collectors, dry display is simpler and arguably more authentic to what makes sea glass special in the first place.
Quick Project Ideas by Skill Level
Beginner (No tools needed)
- Fill a clear jar and place on a windowsill
- Arrange pieces on a white plate or shallow bowl
- Create a color gradient on a wooden tray
- Fill a clear lamp base with sea glass
Intermediate (Basic tools and adhesive)
- Build a shadow box display
- Make a framed sea glass art piece
- Create wire-wrapped suncatchers
- Glue pieces around a mirror frame
Advanced (Workshop skills helpful)
- Mosaic a tabletop or serving tray
- Pour resin window panels
- Build a backlit display shelf
- Embed pieces in concrete stepping stones
- Install sea glass into a tile backsplash
Start simple. A jar on a windowsill costs nothing and takes two minutes. If you enjoy displaying your collection and want to try something more involved, work your way up. The best display is one that makes you happy every time you walk past it and reminds you of the beaches where you found each piece.
New to collecting? Our beginner's guide to sea glass collecting covers everything you need to know to start building a collection worth displaying. And if you want to understand what your rarest pieces are actually worth, check out our sea glass value and grading guide.
Frequently Asked Questions
What is the best way to display sea glass at home?
Clear glass jars on a sunny windowsill are the simplest and most popular method. The light passes through the glass and shows off the colors beautifully. For more valuable pieces, shadow boxes or individual display stands give each piece room to shine. The best display depends on whether you want a casual decorative look or a curated collection showcase.
Should sea glass be displayed wet or dry?
Both have merits. Dry sea glass shows the characteristic frosted surface that collectors value. Wet sea glass reveals deeper, more vibrant colors - closer to what the glass looked like originally. Some collectors keep a small dish of water to display favorite pieces wet, while others use a light coat of mineral oil to split the difference. For permanent displays, dry is easier to maintain.
How do you make a sea glass suncatcher?
The simplest method uses clear-drying adhesive and a transparent base like an old picture frame glass or clear acrylic sheet. Arrange your sea glass pieces in a pattern, glue them down, and hang the finished piece in a window. For a more advanced version, use copper foil tape and solder to create a stained-glass-style frame around each piece. Suncatchers work best with thinner, more translucent pieces that let light pass through.
Can you glue sea glass without ruining it?
Yes, if you use the right adhesive. E6000 and clear silicone adhesive both work well and can be carefully peeled off later without damaging the glass. Avoid super glue (cyanoacrylate) - it bonds too aggressively, leaves white residue, and is nearly impossible to remove cleanly. For reversible displays, museum wax or poster putty hold pieces in place without any adhesive at all.