You've spent hours combing beaches, filling your pockets with frosted glass worn smooth by decades in the ocean. Now what? Most collectors eventually face the same question: what do you actually do with all this sea glass?
Jewelry is the most popular answer, and for good reason. A piece of sea glass that spent 30 or 40 years tumbling in the surf carries a history that no store-bought gem can match. Turning it into a pendant, ring, or pair of earrings lets you wear that history - and it makes a gift that means something beyond just looking nice.
The good news is that you don't need expensive equipment or years of metalsmithing experience to make beautiful sea glass jewelry. Wire wrapping - the most accessible technique - requires about $20 in supplies and an afternoon of practice. This guide walks through the main approaches, from the simplest wrapping methods to drilling and bezel-setting, so you can pick the technique that fits your skill level and the pieces you want to work with.
Choosing the Right Pieces for Jewelry
Not every piece of sea glass you find makes good jewelry. The difference between a nice beach find and a wearable piece comes down to a few practical factors.
Size matters. For pendants, look for pieces between the size of a nickel and a quarter. Smaller than that and they're hard to wrap; much larger and they become heavy and awkward to wear. For earrings, aim for pea-sized to dime-sized pieces, and try to find pairs that roughly match in color, size, and thickness.
Shape affects your options. Triangular and teardrop shapes work beautifully as pendants with minimal wrapping - gravity does most of the visual work. Round and oval pieces suit bezels and wrapped rings. Flat, thin pieces are easier to drill without cracking. Irregular shapes with interesting curves can become statement pieces, but they require more creative wrapping to look intentional rather than sloppy.
Surface quality is everything. The best jewelry-grade sea glass has a consistent, thorough frost across the entire surface with no shiny spots or chips. Hold the piece up to light - well-weathered glass has an even, milky translucence. Pieces with remaining sharp edges or clear patches haven't been in the ocean long enough and won't look as refined. Check our guide to identifying real vs. fake sea glass if you're buying pieces rather than finding them yourself.
Color choice. White and green sea glass are the most common, which makes them good for practicing techniques before you commit your rare colors to a project. Save your reds, oranges, and cobalt blues for after you've gotten comfortable with your chosen method. A botched wire wrap on a common white piece costs you nothing. A cracked red piece is irreplaceable.
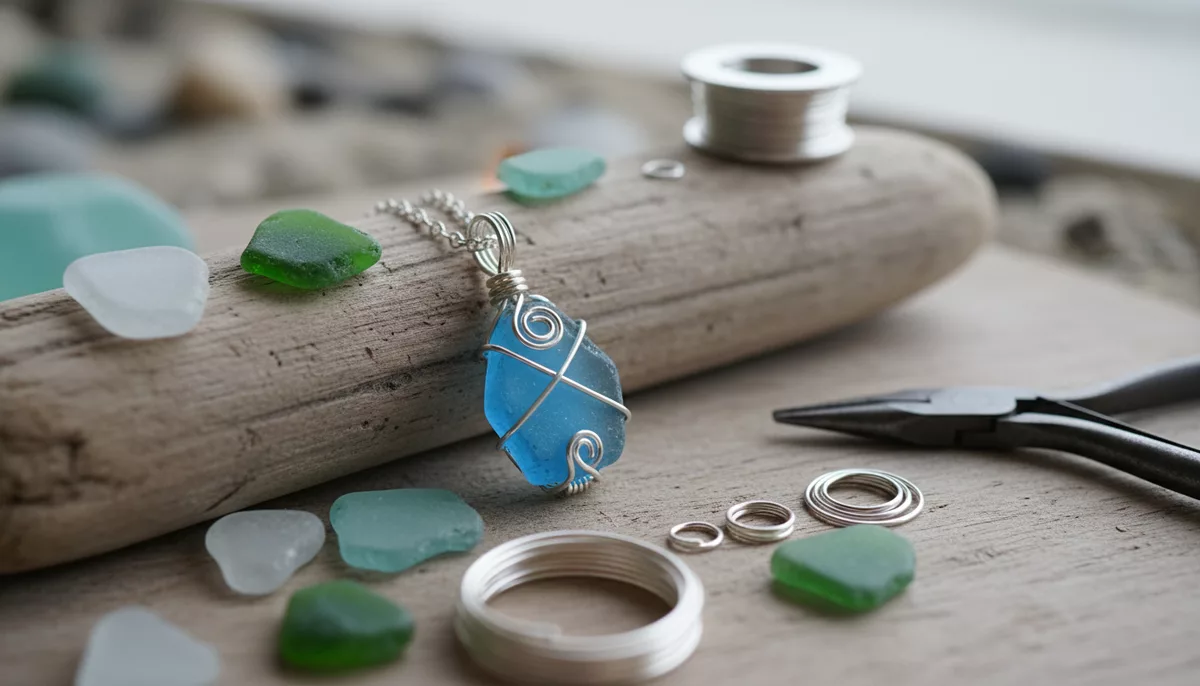
Method 1: Wire Wrapping (No Drilling Required)
Wire wrapping is where most people start, and many experienced sea glass jewelers never move beyond it. The technique involves bending wire around the glass to create a secure cage or frame that holds the piece without permanently altering it. If you change your mind about a design, you can unwrap the wire and start over. You can't undo a drill hole.
What You Need
- Wire: 20-gauge half-round or round wire for the main wrap. 18-gauge for bails (the loop that connects to a chain). 26-gauge for decorative binding. Sterling silver, copper, or gold-filled depending on your budget and the glass color.
- Round-nose pliers: For making loops and curves in the wire.
- Chain-nose pliers: For gripping wire, making tight bends, and tucking in ends.
- Flush cutters: For cutting wire cleanly without leaving sharp burrs.
- A chain or cord: Sterling silver chains in 16 to 20 inch lengths are standard for pendants.
Basic Pendant Wrap: Step by Step
This is the simplest wrap that still looks polished. It works best on teardrop or triangular pieces.
Step 1: Measure your wire. Cut about 12 inches of 20-gauge wire. You'll trim the excess later - it's better to have too much than too little. Straighten the wire by pulling it firmly between your fingers or rolling it on a flat surface.
Step 2: Create the frame. Hold the glass in your non-dominant hand. Lay the wire across the back of the glass about one-third of the way down from the top. Bend the wire around both sides so it crosses in front, then crosses behind again. You're making a simple loop around the widest point of the glass.
Step 3: Twist at the top. Bring both wire ends up past the top of the glass. Where they meet above the glass, pinch them together with chain-nose pliers and twist them around each other three or four times. Keep the twists tight and even - this is the most visible part of the piece.
Step 4: Form the bail. Take one wire end and use round-nose pliers to curl it into a loop large enough for your chain to pass through. Wrap the remaining tail around the base of the loop two or three times to secure it. Cut the excess flush and tuck the cut end in with chain-nose pliers so it doesn't scratch skin.
Step 5: Finish the second wire. Take the other wire end and wrap it decoratively around the twist or down around the glass, depending on the look you want. Some people spiral it into a small coil on the front of the glass. Others wrap it down one side for asymmetry. There's no wrong answer - experiment on practice pieces until you find your style.
Step 6: Check everything. Squeeze the wrap gently to make sure the glass is held securely. It shouldn't wobble or rotate within the wire frame. Run your finger over all wire ends to check for sharp points. Thread it on a chain and hold it up - does it hang the way you want? Adjust the bail position if needed.
Tips for Better Wraps
Practice on cheap glass or tumbled stones before using your good sea glass. Your first few attempts will look rough, and that's normal. Most people need five or ten practice pieces before they produce something they'd actually wear.
Keep your wire as smooth as possible. Every time you bend wire and then straighten it, it creates a mark. Plan your bends before you commit to them. If you make a mistake, start with fresh wire rather than trying to fix a kinked section.
Match your wire color to your glass. Sterling silver looks stunning with blue and white sea glass. Copper complements greens and browns. Gold-filled wire pairs well with amber, yellow, and warm-toned pieces.
Method 2: Drilling Sea Glass
Drilling a hole through sea glass opens up design options that wrapping can't achieve. A drilled piece can hang freely from a simple jump ring, sit flush against skin without bulky wire work, or be strung on a beaded necklace alongside other materials. The tradeoff is permanence and risk - once you drill, there's no going back, and cracking is always a possibility.
What You Need
- Diamond-tipped drill bits: 1mm to 2mm diameter for most jewelry holes. Buy a multi-pack - they wear out. Solid core bits for small holes, hollow core bits for larger holes.
- A rotary tool (Dremel) or drill press: Variable speed is essential. You want to drill at low RPM - around 5,000 to 10,000 for a Dremel, or the lowest setting on a drill press.
- A shallow container of water: The glass must be submerged while drilling. A plastic food storage container works perfectly.
- Modeling clay or putty: To hold the glass steady underwater.
- Safety glasses: Glass dust and water spray aren't things you want in your eyes.
Drilling Step by Step
Step 1: Set up your water bath. Press a lump of modeling clay into the bottom of your container. Push the sea glass into the clay so it sits firmly with the drilling surface level. Add enough water to submerge the glass by at least a quarter inch. The water serves as coolant - without it, the friction from drilling generates enough heat to crack the glass instantly.
Step 2: Mark your spot. Decide where you want the hole. For a pendant, it's usually near one edge, about 3mm from the rim. Too close to the edge and the glass can chip out; too far in and the pendant won't hang right. You can mark the spot with a permanent marker - it'll wash off later.
Step 3: Start drilling slowly. Place the drill bit on your mark at a slight angle - about 45 degrees. Run the drill at low speed and let the bit create a small divot. This starter dimple prevents the bit from skating across the glass surface. Once you have a dimple, straighten the drill to 90 degrees and continue at low speed with very light downward pressure.
Step 4: Let the bit do the work. This is the hardest part for beginners - the temptation to push down is strong. Resist it. Heavy pressure generates heat and causes cracking. The diamond coating on the bit does the cutting; your job is just to keep it in position. Lift the bit every few seconds to let water flow into the hole and flush out glass dust.
Step 5: Drill from both sides. When you're about halfway through the glass, flip the piece over, re-secure it in the clay, and drill from the other side to meet the first hole. This technique dramatically reduces chipping on the exit side. If you drill straight through from one side, the bit often punches through the last layer and creates a ragged edge.
Step 6: Clean up. Rinse the glass thoroughly. If there are any rough edges around the hole, you can smooth them by running the drill bit around the hole at an angle to create a slight chamfer. Dry the piece and inspect it - the hole should be clean and round on both sides.
Drilling Tips
Thicker glass is actually easier to drill than thin glass. Thin pieces flex under the drill and crack more easily. If a piece is thinner than about 4mm, consider wire wrapping instead.
Cold water works better than room temperature water. Some jewelers add ice cubes to their drilling container. The colder the water, the better it cools the glass at the drilling point.
New drill bits cut faster and cleaner than worn ones. If you notice the bit is taking longer or generating more friction, swap it out. A dull diamond bit is the most common cause of cracked pieces.
Method 3: Bezel Settings
Bezel setting involves creating a thin metal wall that wraps around the edge of the glass and folds over to hold it in place. It's the most professional-looking approach and the method used by most high-end sea glass jewelers. But it's also the most technically demanding - you'll need some basic metalworking skills and a few additional tools.
A bezel works by creating a custom-fit collar from thin metal strip (called bezel wire), soldering it to a backplate, setting the glass inside, and then carefully pushing the metal wall over the edge of the glass to lock it in place. The result is a clean, modern look where the glass appears to float in a slim metal frame.
For beginners, consider starting with adjustable bezel cups or pre-made settings available from jewelry supply stores. These let you skip the soldering step and jump straight to setting the glass. They won't look as refined as custom-made bezels, but they're a reasonable middle ground while you build skills.
Finishing Touches
Choosing Chains and Findings
The chain matters more than people think. A beautiful pendant on a cheap chain looks worse than a simple pendant on a quality chain. Sterling silver cable chains in 1.5mm to 2mm width work well for most sea glass pendants. For heavier pieces, go with a thicker box chain that can handle the weight without kinking.
Match the finish of your findings (clasps, jump rings, chain) to your wrapping wire. Mixing silver wire with gold-tone clasps looks like an accident, not a design choice.
Cleaning and Care
The frosted surface of sea glass is what makes it special - don't try to polish it to a shine. Clean finished pieces with warm water and a soft cloth. Avoid ultrasonic cleaners and chemical jewelry dips - they can affect the frost and damage wire wraps.
Store sea glass jewelry separately from other pieces. The glass can scratch softer metals, and harder gemstones can chip the glass. Individual pouches or compartments in a jewelry box work well.
Common Mistakes to Avoid
Using too much wire. The glass should be the star of the piece, not the wire. A common beginner mistake is wrapping the glass so heavily that you can barely see it through the wire. Less is almost always more - aim for the minimum amount of wire that holds the glass securely and looks intentional.
Drilling without water. This will crack your glass every single time. No exceptions. Even a few seconds of dry drilling generates enough heat to cause a fracture. Keep the glass submerged throughout the entire drilling process.
Ignoring ergonomics. A pendant that looks great lying flat on a table might hang awkwardly on a chain. Always test how the piece hangs before finishing the bail. The heaviest part of the glass should point downward, and the bail should be positioned so the piece faces forward, not sideways.
Starting with rare pieces. Practice every technique on common white and green sea glass before committing rare colors to a project. You will make mistakes during the learning process. A broken piece of green glass is no big deal. A broken piece of red glass might be the only one you ever find.
Skipping the tumbling stage. If you're collecting glass specifically for jewelry, some pieces benefit from an extra round of tumbling in a rock tumbler with fine grit. This smooths any remaining sharp edges and creates a more uniform frost. It adds about a week to the process but can turn a good piece into a great one.
Selling Sea Glass Jewelry
If you get good at this, selling becomes a natural next step. Sea glass jewelry sells well at craft fairs, farmers markets, and on platforms like Etsy. Pieces made from genuinely beach-collected glass (as opposed to machine-tumbled craft glass) command premium prices - a well-made pendant from a rare color can sell for $50 to $200 or more.
Photography matters enormously for online sales. Natural light on a simple background - driftwood, linen fabric, or weathered wood - works better than fancy studio setups. Show the piece from multiple angles and include a photo of it being worn so buyers can judge the scale. For a complete walkthrough of lighting, backgrounds, and editing, see our guide to photographing sea glass.
Always disclose where the glass was collected and that it's genuine sea glass, not manufactured. Authenticity is your competitive advantage over mass-produced jewelry. Buyers pay more for a piece that comes with a story - where you found the glass, what makes the color rare, how long it likely spent in the ocean. Our sea glass color rarity chart can help you identify and price your pieces based on color scarcity.
Getting Started Today
You don't need to invest hundreds of dollars in tools to make your first piece. A spool of 20-gauge sterling silver wire, a pair of round-nose pliers, chain-nose pliers, and flush cutters will get you started for under $30. Watch a few wire wrapping videos to see the techniques in motion, then grab a piece of common sea glass and start experimenting.
The pieces you make with your own hands from glass you found yourself carry a meaning that no store-bought jewelry can touch. Every pendant holds a story - the beach, the weather, the moment you spotted that flash of color in the gravel. That's worth more than perfection.
Need glass to practice with? Check our beginner's guide to sea glass collecting for tips on where to find the best pieces, or browse our location guides for beaches known to produce jewelry-grade sea glass. And if you have pieces that aren't quite right for jewelry, our sea glass display ideas guide covers shadow boxes, suncatchers, mosaics, and other creative ways to showcase your collection.
Frequently Asked Questions
Do you need to drill sea glass to make jewelry?
No. Wire wrapping and bezel settings let you make beautiful sea glass jewelry without any drilling at all. Drilling is one option, but many jewelers prefer wrapping because it preserves the glass and doesn't risk cracking a rare piece. If you do want to drill, use a diamond-tipped drill bit and keep the glass submerged in water while drilling.
What wire gauge is best for wrapping sea glass?
20-gauge wire works well for most sea glass wrapping. It's thick enough to hold the glass securely but thin enough to bend smoothly around curved edges. For the bail (the loop that attaches to a chain), use 18-gauge wire for extra strength. For decorative wrapping details, 26-gauge wire gives you finer control.
What is the best metal for sea glass jewelry?
Sterling silver is the most popular choice because it complements the frosted finish of sea glass without overpowering it. Copper is a good budget option that develops a nice patina over time. Gold-filled wire works well for warmer-colored glass like amber and brown. Avoid plated wire if you plan to sell - the plating wears off and looks cheap quickly.
Can you use a regular drill to drill sea glass?
You can use a regular handheld drill or a Dremel rotary tool, but you must use a diamond-tipped drill bit designed for glass. Standard metal or wood bits will crack the glass immediately. The key is drilling slowly, applying very light pressure, and keeping the glass submerged in water throughout the process. Never drill dry - the friction generates enough heat to shatter the glass.
How do you polish sea glass for jewelry without losing the frosted look?
You generally don't want to polish sea glass - the frosted surface is what makes it valuable and distinctive. Just clean it with warm water and a soft brush to remove salt and sand. If the glass is particularly dirty, a brief soak in white vinegar followed by rinsing will clean it without affecting the frost. Avoid any abrasive polishing compounds - they'll remove the frosted coating that took decades to form.